Thank you for sharing the coastal love:
For your convenience this post may contain affiliate links. If you make a purchase I may earn a small commission, at no additional cost to you. I'll probably blow it on a cheapo pair of flip-flops or bottle of wine :-)
THE ULTIMATE DIYer TOOLKIT Check List
Be sure your toolbox always has exactly what you need for any project! These checklists are perfect for Home Decor Crafters & Makers.
Sand Dollar Knock-Off Wall Art Decor Using Sand Paint Finish
When I first saw the catalog image of a large (36 inch) Sand Dollar, the $242 price got me thinking about creating a Knock-Off.
Okay, my inspiration piece was by an Italian artist so there’s really no apples to apples comparison here. However…
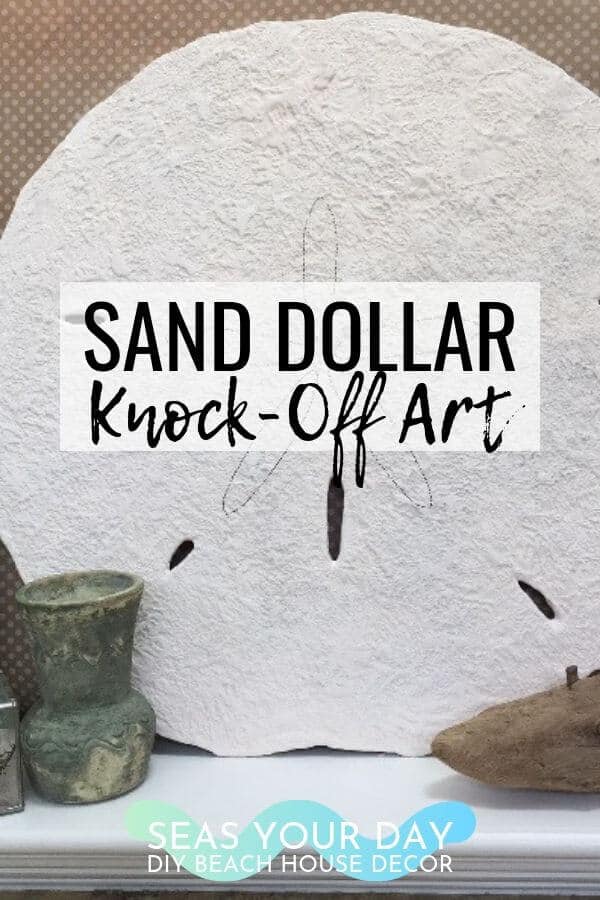
The wooden Sand Dollar art idea I created is still large, approximately 24-inches. And in my opinion, the shape looks more “authentic”. Finally, the sand paint finish gives the final product nice texture and dimension.
I’m calling this DIY coastal decor art project a winner.
QUICK LINKS TO INFO IN THIS POST
$242 Catalog Version and Knock-Off Version for about $10
Sand Dollar on the LEFT is from a catalog offered at $242.00.
Sand Dollar on the RIGHT is my knock-off version. It cost less than $10 to make.
Create your own Objet d’art!
Objet d’art is a fancy French term that literally means “work of art”. Think large paintings, wood carvings, stone sculptures or decorative pieces.
I visited an Italian glass factory a few years ago and heard this term a lot to describe the small blown glass figurines they produced.
Often these prized art objects come with a high price tag.
When I saw this Sand Dollar wall piece, and the cost, it was time to create a knock-off version, with a twist.
 Nature always inspires…the background is a sand painted board.
 The DIY MASH-UP version of a Sand Dollar Statement Piece
There are very few “original” ideas out there. There’s a video series floating around the internet called Everything Is A Remix. It’s specific to movies, but fun to see how STAR WARS is partly a remix of old Cowboy movies.
So, for this DIY Sand Dollar art project I remixed a Salt Paint idea inspired by Shabby Creek Cottage , the Italian designer’s catalog item and a real sand dollar as a reference point. These combined ideas became this statement art piece.
I hope you like it as much as I had fun making it.
 CLICK IMAGE TO SEE THE LIST
MATERIALS YOU’LL NEED TO MAKE YOUR SAND DOLLAR WALL ART with SAND PAINTED FINISH
- 24-inch pine board, 1/4-inch thick (use any size you like but I wanted to make a large Statement piece)
- Circle template. Or enlarge this Sand Dollar image.
- Scroll Saw (I used a RYOBI brand and extra blades)
- Black Marker, Pencil, Scrap Paper, Scissors
- 150-grit and 110-grit Sandpaper
- Palm Sander (I have a crappy one that needs to be replaced. This one’s a favorite for small DIY home projects.)
- Safety goggles
- Salt Paint or Sand Paint (get recipe here)
- Chip brush
- Acrylic Paints. I used gray and flesh. (use whatever color you like to coordinate with your space)
- Permanent Fine Point Sharpie Marker, Dark Brown
- Thin Artist Brush (nothing fancy)
- Spray sealant in Matte finish
STEP-BY-STEP INSTRUCTIONS TRACE, SHAPE & CUT WOOD

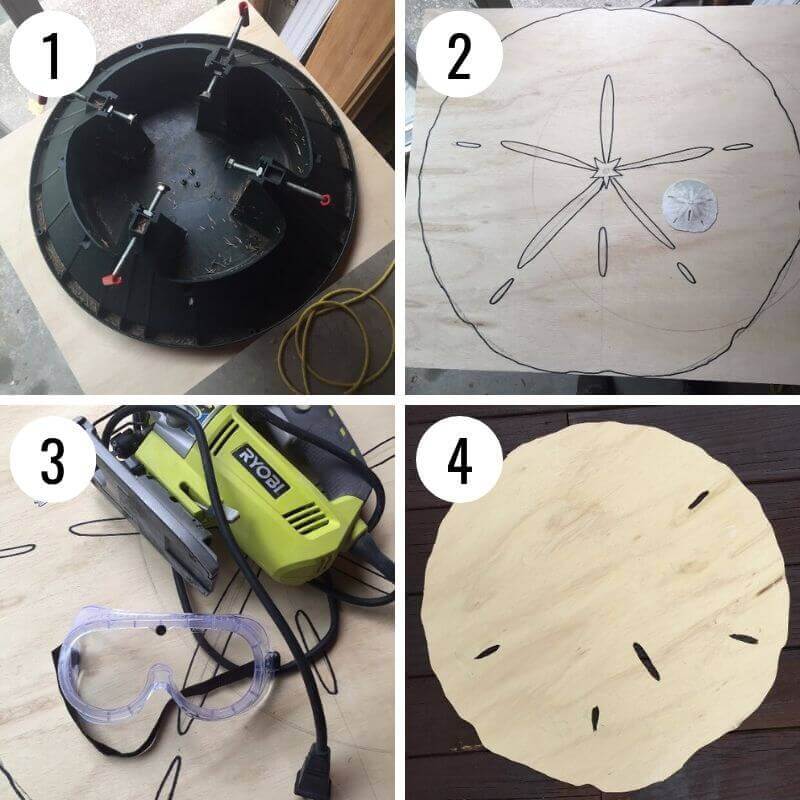
STEP 1: Trace or Draw a circle shape
My Christmas Tree stand was the perfect size to create the circle! (There’s pine needles in it — do they ever go away?)
A pizza pan or plastic deli tray will do. Or use the sand dollar template, enlarging the image to fit your board. I marked the shape with a black sharpie to make it easier (for my eyes) to see!
STEP 2: Draw a rough layout of the sand dollar design
I referenced a real sand dollar as a shaping guide and to find the 5 inner cut out areas. The “petals” will be covered over with the sand or salt paint but drawing them helped me figure out where the cut outs belong.
STEP 3: Cut out sand dollar shape using scroll saw
To cut the 5 inner areas I used a drill first to make a big enough hole to allow the scroll blade to fit. Then just cut the shapes.
STEP 4: Clean up finished cut out
I had a few wood pieces not cleanly cut for the inner cuts. It’s probably more a testament of my skills than anything else! Any bits can be poked off with a screwdriver so that the cut out is clearly defined. You don’t need to sand any of this.
PAINT & SAND DRIED SAND DOLLAR

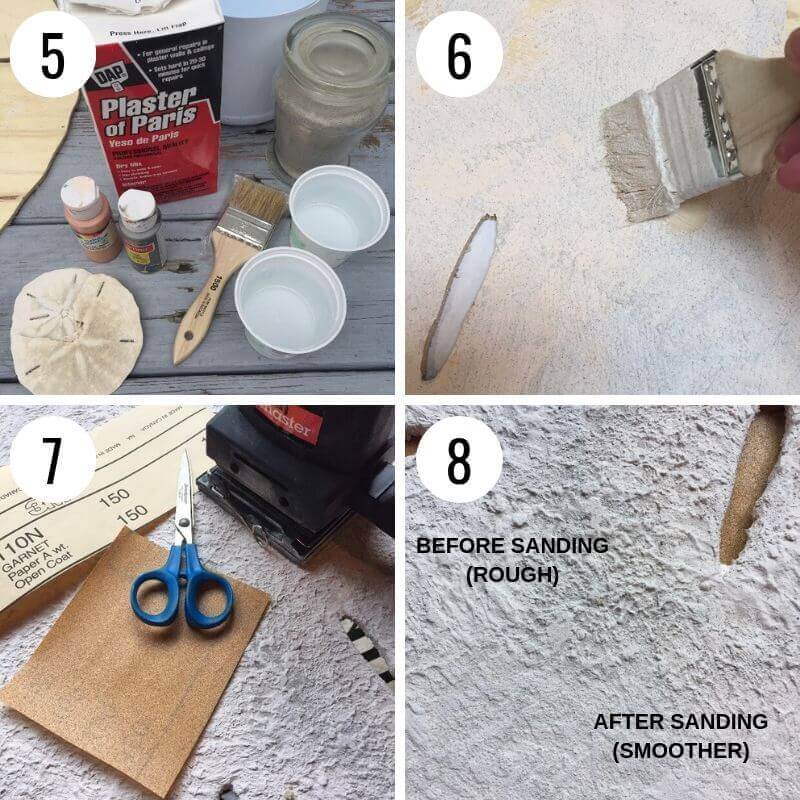
STEP 5: Mix Sand Paint
See this post for How To Make Sand Paint.
STEP 6: Paint
As a reminder, this mixture sets up fast so you’ll need to work quickly. Be sure to work the sand paint into the wood with the brush as you go. Let dry completely.
NOTE: For the size of this piece I tripled the sand paint recipe. In hindsight I would have made three separate batches. I looked like a mad woman trying to glop it all on before the brush seized up on me.
STEP 7: Sand the roughness
Use a Palm Sander with 150-grit sandpaper to knock down the high pointy areas. At this point you can sand down as much or as little as you like to achieve your unique look. I started with the electric sander and then sanded by hand using 110-grit sandpaper until I got the smooth look.
STEP 8: Remove excess sanding dust
I used a shop vacuum cleaner in reverse to blow off the dust (outside)!
ADD FINISH DETAILS (Let’s make it look more like a Sand Dollar)

STEP 9: Create “petals” with dots
Draw and cut out paper “petal” shapes in two sizes. The size of your piece will determine the size of the petals. Just eyeball it.
Arrange the petal cutouts on the painted and sanded Sand Dollar. Use image #2 or a real sand dollar above as a sizing and layout guide. Then dot around the edges with a brown fine point Sharpie.
Draw a small circle in the center of the petals and make a dot between each petal. (See Image #12)
STEP 10: Feather the petals
Use a small amount of acrylic paint (I used brown to match the dots) to paint little lines around the dots. If you’re game, use a feather brush for a nice look.
NOTE: I’ll make another one of these but next time I’d leave more space between the dots and the feathering. Plus I’d make the feathering a bit wider. That’s just me!
STEP 11: Paint the edges and inner cut outs
Optional: To add dimension, use the same paint to go around the edge of the sand dollar and also the inner cut outs.
STEP 12: Spray coat finished piece
Lastly, apply one or two thin coats of a matte clear spray sealant. Let it dry before displaying.
DISPLAY YOUR OBJET D’ART
Thinking ahead, if you plan to hang your Sand Dollar statement piece, rather than lean it, say, on a mantel, it’s better to attach your desired hanger before you start painting. The less you bump the piece around the better. If your wood piece is thicker than the 1/4-inch I used in this example, be sure you use a secure hanger.
I keep an inexpensive picture hanging kit like this one in my DIY Toolbox.
In an afternoon, you can create a beautiful sand dollar replica that rivals a $200-plus piece.
Here’s a great DIY Idea!
13 SAND DOLLAR ART AND CRAFT IDEAS – Show off your “crafty” side with these 13 Sand Dollar Art and Craft ideas.
WANT TO REMEMBER THIS IDEA? Please PIN THIS POST to your favorite PINTEREST BOARD!

Thank you for sharing the coastal love: