Thank you for sharing the coastal love:
For your convenience this post may contain affiliate links. If you make a purchase I may earn a small commission, at no additional cost to you. I'll probably blow it on a cheapo pair of flip-flops or bottle of wine :-)
A wood pallet, basic tools and leftover wall paint is all you’ll need to make this coffee table in time for coffee…or cocktails!
A friend’s business tosses wood pallets in the trash every day. This makes me cringe. So much potential wasted to the landfill. Ever since I said “yes, please!” when he asked if I wanted one, he regularly drops off pallets.
The battle cry of DIYers is “One man’s trash…”
Hey, if it’s sitting on the side of the road, there’s no shame tossing a weathered pallet (or other potential upcycle items) in your trunk.
My garage currently has four pallets, some intact, some apart, waiting to be repurposed. Of course these reclaimed treasures take up parking space but…all in the name of DIY projects to share with you.
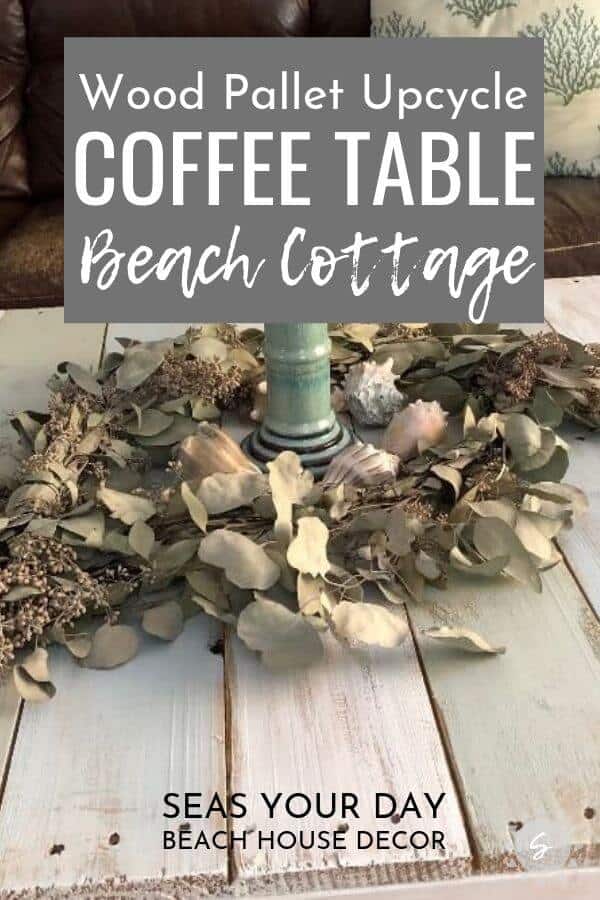
Like this beach cottage style coffee table.
QUICK LINKS TO INFO IN THIS POST
Other than a small split in one board the pallet was in perfect condition. A little sanding to smooth out the rough edges was all the prep required. I had four “legs” (fence posts) from a previous project.
A while ago I saw an Pinterest image of a console table where the maker had painted the top boards in pastel coastal colors. Remembering that, I used leftover paint and dry brushed the boards in alternate colors. The legs and sides were painted in white.
From start to finish, including the painting, you can make a coffee table from a discarded wood pallet in less than two hours.
MATERIALS YOU’LL NEED TO MAKE A COFFEE TABLE FROM A WOODEN PALLET
Wood Pallet
Four Legs (your choice: fence post, recycled table legs, etc.)
Screws (size will depend on the thickness of legs used)
Cordless Screwdriver
Paint and colors of your choice.**
Sand Paper (or Palm Sander)
Paintbrushes (cheap Chip Brushes will do)
Paint Stirrers
How To Make A Beach Cottage Style Coffee Table from A Wooden Pallet
STEP-BY-STEP INSTRUCTIONS

STEP 1: CUT FOUR LEGS
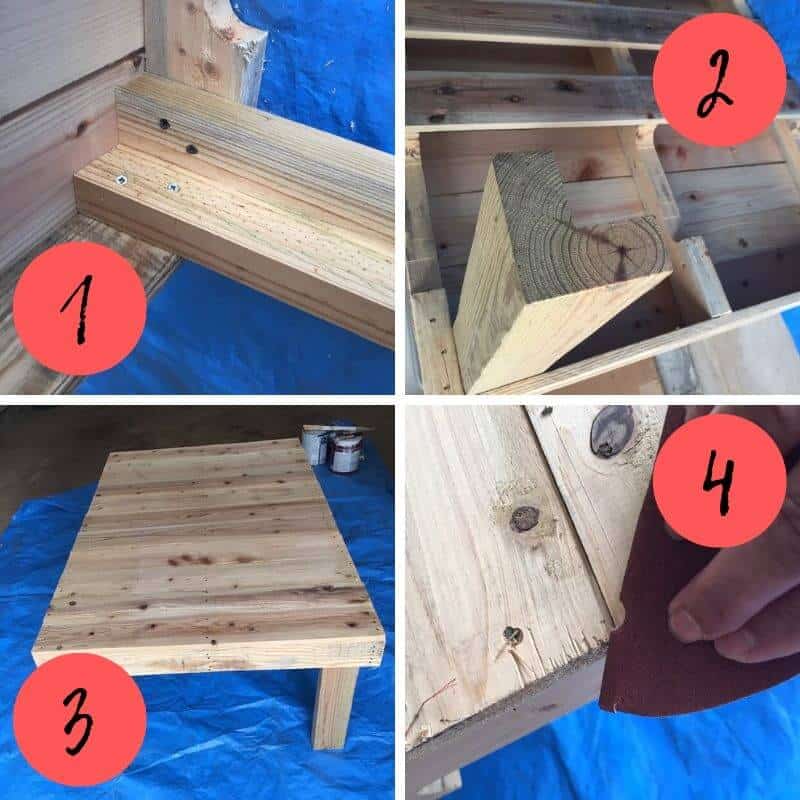
Okay, I cheated a bit because there were four fence posts that had been previously cut for a small TV stand. One-quarter had been removed, leaving an “L” shape (see Image 2). I screwed two 3-inch decking screws through each side of each leg into the corner of a 4-inch post .
You can use a 4-inch fence post or recycle table legs. Cut four legs to the height of your choice.
STEP 2: REMOVE SLATS, IF NECESSARY
You may need to remove slats under the pallet to make room for the legs. The pallet I used was good to go.
STEP 3: DO A QUICK INSPECTION
One board on the pallet had about a 4-inch split. Normally I’d leave it and chalk it up to “character” but it was loose, and it bugged me. Using wood glue I filled the crack and then (don’t laugh) wedged a pen in between the adjoining board to hold it together. While it dried…
STEP 4: SAND REALLY ROUGH SPOTS
You want the finished piece to be at home in a beach cottage. This isn’t fine furniture! Still, you don’t want to get splinters. Sand down any areas that are rough.
BTW: The split board I glued? I’m sanding it in this photo. Can you see it?
After sanding I vacuumed the table to remove any particles or debris.

STEP 5: CHOOSE PAINT FINISH AND COLORS
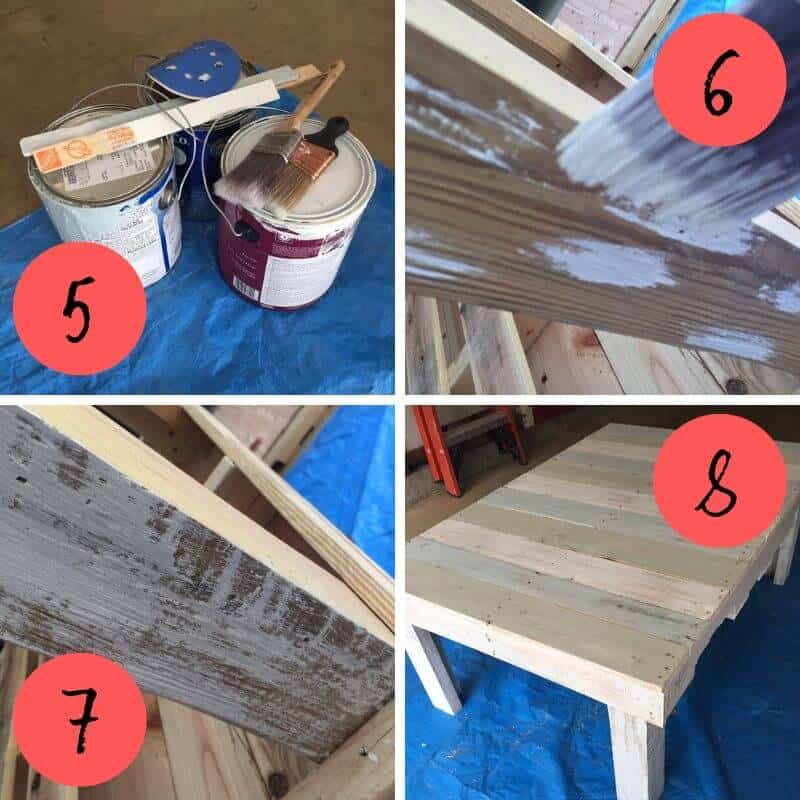
Because I wanted a pastel stripe look for the top and a white washed leg, the paint I chose is leftover interior paint from bedrooms and trim. Colors: Peaceful Jade (Benjamin Moore) from the front entryway and Tradewind (Sherwin-Williams) from this bedroom makeover.
**Optionally, Chalk Paint (like Heritage, Annie Sloane or American Decor) or Acrylic Craft Paints are good choices. If you plan to use the table outside, consider using exterior paint or stain the table. Because these paint aren’t as durable as house paint, whether you plan to use the table indoors or outdoors, I’d suggest you seal the the table with a spray sealer coat or furniture sealing wax. I prefer using wax over chalk paint. You rub it on, give it an hour to set and then rub off. Besides protecting the piece, the wax adds a nice looking finish quality. Up to you.
STEP 6: PAINT THE TABLE LEGS AND SIDES
Paint the table to your style, using colors you love.
To get this whitewashed look: Dip a dry paintbrush into the white paint. Paint spots in a random pattern.
STEP 7: DRAG BRUSH or SAND to DISTRESS FINISH
If you like this distressed finish, paint one leg at a time, and one apron side at a time.
Dip the brush end in a TINY bit of paint. You can always add more. Then drag the brush in a single direction. Add more paint to your brush as needed and repeat dragging the length of the leg or board you’re painting.
If you’ve added too much paint, don’t fret my pet. Let the paint dry thoroughly and then distress over-painted areas using sandpaper.
STEP 8: PAINT THE TABLE TOP
Paint the top boards in your chosen color(s). For this project I alternated blue, green, white.
Finish the coffee table by letting it dry completely overnight before using. I haven’t added a sealer or wax coating, yet. Personally I’m not concerned about spills or stains or scratches.

The shabby look of the table is the nature of beach cottage style. I love this coffee table for its simplistic design. This project will be right at home in Coastal Farmhouse style too. The generous size and durability comes from an upcycled wood pallet and fence posts.
Plus, it’s an easy DIY project that uses basic tools and supplies. In no time you’ll go from a discarded wood pallet to a coffee table ready for…coffee?
SAVE THIS DIY PROJECT to your favorite Pinterest DIY or Coastal Decor Board.

P.S. We want your browsing experience to be a great one. Find an error, missing or broken product link? Contact me here and I’ll fix it. Thank you!

Thank you for sharing the coastal love: